
My Mother-in-law has always had cube shaped ottomans in her home and she's totally turned me on to them. They're great for propping up your legs, extra seating, and for occasionally blocking off rooms you don't want doggies to get in! I'm not even sure how many she has in her living room at the moment. Three? Maybe four? When we moved into our home.. she sent two of her older ones along with us and I'm so glad she did. They are really convenient when we have a bigger group of people over. The only thing is.. they look worn and they don't quite "go" with our decor so we've been wanting to recover them somehow.

I was browsing around Etsy for kitchen chair ruffled slipcovers when I thought to search for ruffled ottoman pictures. Low and behold.. someone had already thought it up! Now, I have never used a sewing machine. I'm sure I could.. I've just never tried. So, I made the first slipcover for our cubes by hand.
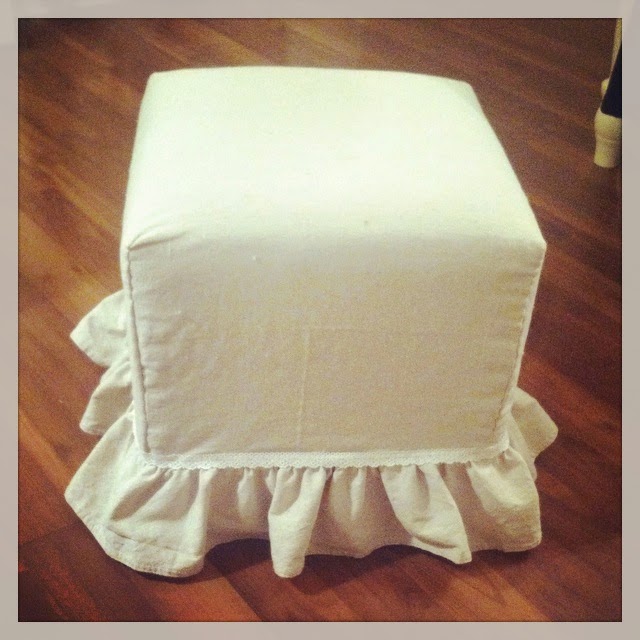
It turned out pretty darn good if I do say so myself!
After doing a little research, I decided to pick up some drop cloths at Lowes to carry out this project. I bought two 4x5 ft. drop cloths by Finish Factor and one 6x9 ft. by Blue Hawk. I have some other cover ideas in my head so I wanted to get a big one so I'd have left overs. Plus.. I knew I'd need some nice long pieces to make the ruffle. I didn't even worry about changing the color of the drop cloths. I just tossed them in the washer and dryer to soften them up a bit. The natural color goes perfectly with our home.
Here's how you do it!
1. Lay the 4x5 drop cloth inside out over your cube.

2. Decide how long you want your ruffle to be and trim around the drop cloth accordingly. After my drop cloth shrunk, two sides were already up off the ground by about 4 inches. To make life easier, I followed that length all the way around.
3. Start at one corner and begin pinning. Because I already shrank the drop cloth, I pinned it pretty tight to the cube but not too tight. I wanted to make sure I'm able to pull it on and off easily. Do the same for all four corners.

4. Trim the corners after pinning so that the fabric isn't bunched up on the cube.

5. Take the drop cloth off and begin sewing a plain ole stitch by hand where your pins are. Make sure you're sewing on the side that you won't see when it's all complete. You may want to trim the corners again after sewing.
6. Slide the cover right side out onto the cube. It should look like a plain ole slipcover.. missing some length. My Father-in-law stopped by when I got to this point and he thought I measured wrong but he didn't say anything until I started pinning my ruffle on! He started laughing because it was then that he understood that I did, in fact, know what I was doing.
I already measured the cube while I was waiting for my drop cloths to dry and the perimeter was 70 inches. You want to cut a strip that is at least double that number for your ruffle. I cut my piece 144 inches by 5 1/2 inches.. which was the length I needed for the ruffle to reach the floor plus an inch and a half. I cut the 6x9 drop cloth to do so and had to sew two strips together to get the length I needed. I also used the hem of the drop cloth so that I wouldn't have to hem my ruffle. If you need to hem yours, you'll want to cut your strip a little wider to leave room for a hem before you begin sewing the ruffle.

7. Sewing the ruffle would be a lot easier and quicker with a sewing machine but it looks just as good when done by hand. All I did was take my long strip and sew a basic running stitch (is that term even right?!) along the top. When I got to the end.. I pulled my thread tight and adjusted the ruffle.

8. Pin the ruffle and base of the slip cover right sides together then sew the ruffle to the cover. You'll want to take the cover back off to sew once you've pinned. It's much easier than trying to sew with it on the cube.. trust me!

9. I used a pretty lace trim I found at Walmart to cover any seams. I simply hot glued it on as I'd seen on dear lillie. It works just as well and went faster than if I had tried to sew it on.

And there you have it!

I've never taken a sewing class.. so this project requires more time and patience than it does skill and this is definitely do-able without a sewing machine.
I think I'm going to head over to my Mother-in-laws to use her sewing machine on the second one so that I can finish it quickly and get started on my next project!
My Shopping List:
4x5 drop cloth from Lowes (5.98)*
6x9 drop cloth from Lowes (10.98)
Roll of lace trim from Walmart (2.97)*
Spool of "Natural" thread from Walmart (1.97)
Other things you'll need:
Measuring tape/Ruler
Fabric scissors
Needle
Long pins
Glue gun and glue
*I purchased two in order to cover two cubes
I had a gift card for Lowes so all I had to pay for out of pocket was the two rolls of trim and the spool of thread.
Total Cost: 7.91 !!
Thanks so much for checking out my newest project! Stay tuned for my next one..

No comments:
Post a Comment